Two simple formulas for industrial camera and lens selection
There are lots of guides and resources about cameras and optics for machine vision. However, the vast majority focuses - no pun intended - on the respective features.
After playing around a bit with computer vision, it was time for me to select a camera and a lens. It took me some time to figure out how to do it quickly, so I’ve been wanting to share a basic step by step procedure for a long time. After procrastinating way to much, today is the day.
Choosing a camera-lens combination can be summarized as progressively reducing a set of options. The process presented here is meant to be a quick guide providing some general tips and guidelines: specific cases may need to be handled differently.
Some definitions
Before laying out a procedure, let’s start with some good old definitions:
- Field of view (FOV [mm]): the real world area framed by the system. It’s the portion of the physical world that your camera can see through the lens.
- Smallest feature in the image (feat_0 [mm]): the real world size of the smallest feature you need to detect in the image.
- Pixels for smallest feature (n_px): how many pixels your computer vision algorithm needs to be able to process the smallest feature.
- Sensor resolution (s_r): a pair of numbers that represents how many pixel a camera sensor has, both vertically and horizontally.
- Sensor size (s_s [mm]): a pair of numbers that represents the sensor’s physical size. These can easily be optained by multiplying the sensor resolution by the pixel size, usually expressed in micrometers.
- Working distance (wd [mm]): distance between the object to inspect and the lens. This should be inside a given range, specified in the lens’s datasheet.
- Focal length (f [mm]): a lens parameter, that is a measure of how strongly an optical system converges or diverges rays of light. For our purposes, just think of it as a measure of how much of the physical world is projected on the image sensor. For a given sensor, using a lens with bigger (“longer”) f will result in a more zoomed-in image compared to a lens with a smaller (“shorter”) focal length.
Start with what you have
The starting point for your design should be represented by the characteristics of the object or material you are going to inspect.
First of all, decide the number of pixels needed to describe the smallest feature in the image: if it has a dominant direction, just be sure to choose the other one. Take a scratch, for example: it is usually taller than thicker. Therefore you should set n_px to the number of pixels you want the scratch thickness to be represented by. If you have no idea, a sensible initial choice is between 3 and 5.
The FOV is the second element to determine. Sometimes it’s fixed: if you need to inspect a single metal gear at a time, your field of view is represented in both directions by the gear’s diameter - plus some margin of safety.
Other times, the field of view is not predetermined: if you need to analyze a roll of aluminium while it is being produced, you may need to divide the area to inspect in multiple sections - with a single camera dedicated to each portion. The key in this case is to evaluate how big of a sensor you would need to inspect the entire area at once, and then split it between multiple cameras if the sensor becomes too big - meaning, too expensive. More on this on the next section.
Camera first, lens second
Now that you have:
- the size of the smallest feature,
- the number of pixels that should describe it,
- a value for the field of view
set, you can get the required sensor resolution by:
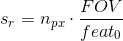
A couple of notes:
- pay attention to using the same units of measurement for the field of view and the size of the smallest feature;
- the field of view is, in general, rectangular. By using two times the equation above, one can both get a value for the sensor’s vertical and horizontal required resolution. When choosing a sensor, both its dimensions must be bigger than the required ones respectively;
- if the field of view is not outlined as a requirement, the easiest thing to do is to create a small table representing the required sensor resolution in relation to the field of view. The most commonly used sensors for machine vision feature resolutions up to 12 Mpx: as a general rule of thumb, if the required sensor size becomes bigger start evaluating a multiple camera solution.
After the sensor resolution has been defined, the sensor size can be obtained by multiplying it by the pixel size. Tables are your friend here too: pick different camera manufacturers’ websites and evaluate multiple sensor sizes. For a practical example, just scroll down to the case study.
Now, let’s get on with the lens. A simple relation between the focal length and the working distance is:

Guess what? You can then create a table to compare the focal length and the working distance. You can also incorporate in this table mechanical constraints for your system: a very common case is to have a minimum or maximum working distance admissible, due to the presence of other components.
Once a set of focal length - working distance combinations has been defined, it is possible to start looking into optics manufacturers’ datasheets to find a suitable lens. Make sure that the lens can be provided with the same mount of the camera, otherwise you won’t be able to connect them.
Enough with the theory: let’s get practical.
Case study
Consider this image, representing a piece of metal containing a crack:

Let’s assume the crack to be 100 mm by 0.3 mm. We aim to detect this defect by using a simple thresholding algorithm needing roughly 5 pixels to describe the smallest feature in the image - the crack itself. We also need to be sure to inspect enough surface to see the entire crack: let’s assume 120 mm by 120 mm, to account for some margin and avoid processing the borders of the image where there could be a certain amount of distortion introduced by the lens.
These assumptions lead us to a sensor resolution of at least:
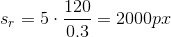
Given that the crack could present itself with arbitrary orientation, the sensor should have a minimum resolution of 2000 px in each direction. A suitable choice would be for instance a camera like this:
| Characteristic | Value |
|---|---|
| Camera model | Model X |
| Resolution | 5.1 Mpx ( 2464 x 2056) |
| Pixel size | 3.45 µm |
| Supported Lens Options | C-Mount, CS-Mount |
| Shutter Type | Global Shutter |
Multiplying the pixel size by the resolution yields a sensor size equal to 8.5 by 7.1 mm. Since it is not a square and we can only choose a single focal length for the lens, either one dimension will be zoomed in — in case of a longer focal length — or will have the feature described by a smaller amount of pixels with respect to what we estimated before.
By applying the above equation for different values of working distance, we can create a table of suitable focal lengths for the application:
| Working distance [mm] | Sensor size [mm] | FOV [mm] | f [mm] |
|---|---|---|---|
| 100 | 8.5 | 120 | 7.083 |
| 100 | 7.1 | 120 | 5.916 |
| 200 | 8.5 | 120 | 14.16 |
| 200 | 7.1 | 120 | 11.83 |
| 300 | 8.5 | 120 | 21.25 |
| 300 | 7.1 | 120 | 17.75 |
| 400 | 8.5 | 120 | 28.33 |
| 400 | 7.1 | 120 | 23.66 |
| 500 | 8.5 | 120 | 35.41 |
| 500 | 7.1 | 120 | 29.58 |
From the table above, we can choose a lens with the following characteristics and mount the system at approximately 200 mm from the object to inspect:
| Characteristic | Value |
|---|---|
| Lens model | Model Y |
| Focal length | 12 mm |
| Max detector size | 2/3” |
| Minimum working distance | 100 |
| Mount | C |
Wrapping it up
This was just a brief introduction to the subject: there’s a lot to say about different camera technologies, I/O interfaces, shutter types and speeds, pixel colors and sizes. Optics is just as complex: one should take into account resolution, distortion, aberration, depth of field and so on. Last but not least, machine vision lighting is a world on its own.
If you are curious about any of these topics, just leave a comment below and we can discuss it or do a specific post about it.